 RSS Feed
 Twitter
 11:26 AM
 Edward Yezekian

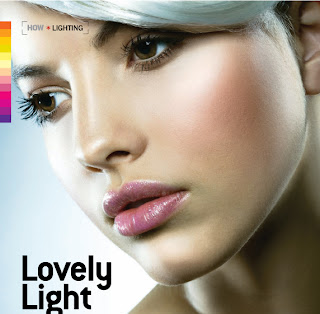
Beauty Photography has always been a major interest of mine, I mean besides the obvious beauty of the subject, I enjoy the polished smooth, and aesthetically more perfect than real look that comes from a combination of just the right light, model, makeup, and vision.
Here is what I had to shoot with:
- 5 Smith-Victor RS8 Light stands $10 each
- 1 background crossbar $30
- 1 boom $40
- 1 5x6 collapsible background - $100
- 1 22" beauty dish $90
- 1 24" Ezybox knock off $40
- 1 Mettle 600W/S strobe $190
- 1 Photogenic PL600 $85
- 2 Yongnuo YN-460's $40 each
- 1 Quantaray PZ1 DSZ $20
- 1 set of Yongnuo CTR-301p triggers $50
- some DIY Sandbags
I used a Canon EOS 5D Mark II camera, EF 135mm F/2L Lens to capture the above shot of our lovely model, Takara. One of the biggest challenges with setting up a photo-shoot on zero budget is getting the talent there. It was a humbling experience sifting through the hundred's of hopefuls that responded to my casting call on Model Mayhem.
I was lucky enough to get Takara on board, although that almost didn't happen either, but that is for another day.
Going back to the original shot, August spent hours just setting up and adjusting his lights. This is time I did not have to spare, because of scheduling issues with the model and makeup artist.
First up, my kit.
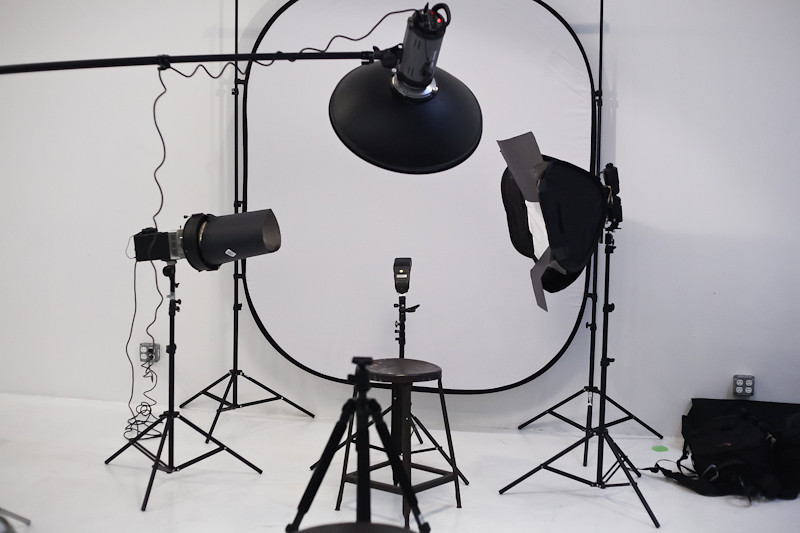 As my main light i used a boomed 22" beauty dish with a mettle 600w/s strobe. I metered this light to be F/16. I chose this aperture because I was originally intending on framing the shot much tighter, similar to how August Bradley's shot was framed, so i wanted plenty of DOF. But after a few shots, I realized my model was more suited to the framing captured in the opening shot of this post. Rather than readjust everything, I shot at F/16. The accent light on camera left is a gridded Photogenic PL600. The beam wasn't as tight as I liked, so i made my own snoot out of black poster board which gave me the control I needed, plus i like the fall off a lot! This light was about a stop over the main. Since I did not have a grid for my softbox on camera right, I flagged the output with some black paper. the part that would hit my model was positioned like a quasi-horizontal strip light, powered by 2 YongNuo YN-460 flashes held together by a rubber band (Yes, I am very high tech!) I also added a 1/4 CTO gel to the YN's because they tend to have a slightly blue hue with a daylight/flash white balance. This was metered maybe a half stop over the main. Finally for my background I placed a Quantaray PZ1 DSZ zoomed to 85mm pretty close up to the BG. I didn't meter this light, but at 1/2 power it blew out where I needed it to and fell off the way I wanted, so, I was happy. I triggered the 2 big strobes and one YN with CTR-301p receivers from YongNuo. The other YN and the Q-RAY were optically triggered. I'm happy to say, no misfires or random fires on this shoot!
I shot a little more than 150 frames for this look, and it was a bit challenging to get the expression and the pose right. It's a bit tricky because of the intensity and precision I was looking for. I give Takara a lot of credit for being as patient and receptive as she was, she's a very good model, and takes direction well. The problem lied in that as soon as she was thinking about her pose, she lost that dead "mannequin" expression I was looking for, and vise versa... Too much thinking! I applaud her understanding, and commitment to getting it right.
I must say, I love the duality in this picture, vibrant, yet dead. It falls very well in line with my vision for the images I have made, and want to continue to make. That is, I make sarcastic images. Images that assimilate a dichotomy of juxtaposing aesthetics.
My original goal, to make an image inspired by the one by August perhaps did not live up to it's original intent. Let's face it, time, experience, subject were all on his side, some would also argue that he used superior gear, which I cannot dispute. In the end though, I wound up with something that I could be proud of, and made the best of the lighting I had available to me (which cost less that $800US in total). Yes, in the end, I am a happy camper!
For more information about August Bradley, checkout his website here.
Please feel free to comment here and do visit my Flickr photostream, and follow me on Twitter and Facebook.

0 comments:
Post a Comment